Polycom IP Phones are very useful as SIP agents extensions in Unified IP 6.x or 7.x environment. They are stable, have great quality, and easy to use. Use this article in order to know how to configure a Polycom IP Phone (especially the SoundPoint IP range) as an agent extension against Aspect SIP Proxy.
You need to know the IP Address of Aspect SIP proxy server. For this article, let us assume that the IP Address is 10.5.9.16 for Aspect server that hosts the Aspect SIP Proxy. The same server also hosts the agent portal. If you have a redundant/high availability environment, then SIP Proxy is hosted on two servers.
Assuming your Polycom phone is powered up and is connected to network and has received an IP Address. To confirm this use this shortcut:-
On Phone's panel, press Menu button, followed by 2 - 2 - 1. It will display the phone's IP Address.
There are two ways to configure the Polycom phone against Aspect SIP Proxy,
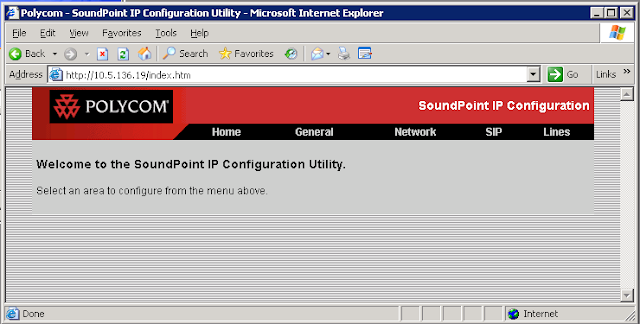
Enter the User Name Polycom (with capital P) and Password 456 and press OK. The Polycom phone's web configuration window will open up:-
Click on the SIP menu link. The below screen will open up:-
Just enter the IP Address of Aspect SIP proxy server (10.5.9.16 in this example), the port of 5060 and select the UDPonly as Transport protocol. No need to fill any field below in Server 1 and Server 2 sections and click the Submit button down there. The phone will physically reboot to take these settings.
After phone has rebooted (can take few minutes), refresh the browser's window to reload the phone's web configuration utility. Now click on the Lines menu link. Below screen will appear:-
Here we actually assign an extension number to this phone. In this example, we gave it the extension number of 4010. Fill all the fields from Display Name until Third Party Name with the desired extension number.
In the Server 1 section, enter the same IP Address that we entered in SIP menu, that is, the IP Address of your Aspect SIP Proxy server, same port number 5060 and Transport protocol of UDPonly. Scroll down, no need to fill the fields under Server 2 and press the Submit button at the bottom.
The phone will reboot again. Once it has started completely, its display will show the extension number you just configured. The Polycom phone is now ready for use as SIP agent's extension with your Unified IP 6.x or 7.x platform.
Note that if you want to assign another extension number to same phone, you can do it under Line 2 of Lines menu link. The procedure will be the same.
At the end, you can confirm that your phone is properly registered with Aspect SIP Proxy. Go to (or open a remote desktop session to) the Aspect SIP Proxy server (which is usually the same server running the agent portals). Click Start - Programs - Aspect Proxy and choose Device Information. Below window will open up:-
This application shows all the devices or end-points (the SIP phones) that are registered and connected with this SIP Proxy. Look for the phone extension you just configured. If it is there then your phone is properly registered, connected and ready for use with Lyricall agent application.
 |
| A SoundPoint IP Series Polycom phone |
Assuming your Polycom phone is powered up and is connected to network and has received an IP Address. To confirm this use this shortcut:-
On Phone's panel, press Menu button, followed by 2 - 2 - 1. It will display the phone's IP Address.
There are two ways to configure the Polycom phone against Aspect SIP Proxy,
- Using the Phone's panel itself
- Using Phone's web interface through any browser on a computer in same network.
Enter the User Name Polycom (with capital P) and Password 456 and press OK. The Polycom phone's web configuration window will open up:-
Click on the SIP menu link. The below screen will open up:-
Just enter the IP Address of Aspect SIP proxy server (10.5.9.16 in this example), the port of 5060 and select the UDPonly as Transport protocol. No need to fill any field below in Server 1 and Server 2 sections and click the Submit button down there. The phone will physically reboot to take these settings.
After phone has rebooted (can take few minutes), refresh the browser's window to reload the phone's web configuration utility. Now click on the Lines menu link. Below screen will appear:-
In the Server 1 section, enter the same IP Address that we entered in SIP menu, that is, the IP Address of your Aspect SIP Proxy server, same port number 5060 and Transport protocol of UDPonly. Scroll down, no need to fill the fields under Server 2 and press the Submit button at the bottom.
The phone will reboot again. Once it has started completely, its display will show the extension number you just configured. The Polycom phone is now ready for use as SIP agent's extension with your Unified IP 6.x or 7.x platform.
Note that if you want to assign another extension number to same phone, you can do it under Line 2 of Lines menu link. The procedure will be the same.
At the end, you can confirm that your phone is properly registered with Aspect SIP Proxy. Go to (or open a remote desktop session to) the Aspect SIP Proxy server (which is usually the same server running the agent portals). Click Start - Programs - Aspect Proxy and choose Device Information. Below window will open up:-
This application shows all the devices or end-points (the SIP phones) that are registered and connected with this SIP Proxy. Look for the phone extension you just configured. If it is there then your phone is properly registered, connected and ready for use with Lyricall agent application.


No comments:
Post a Comment